Click Settings > Terminology
System Terminology
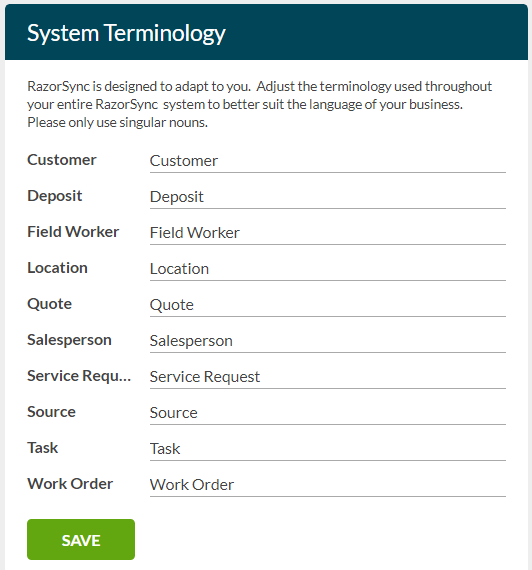
Rename each of the terms above to suit your companies terminology. This will apply to all sections within your portal, as well as the mobile applications.
Example: Customer could be Client, or Field Worker could be renamed to Tech, Quote could be titled Estimate
Customer Terminology
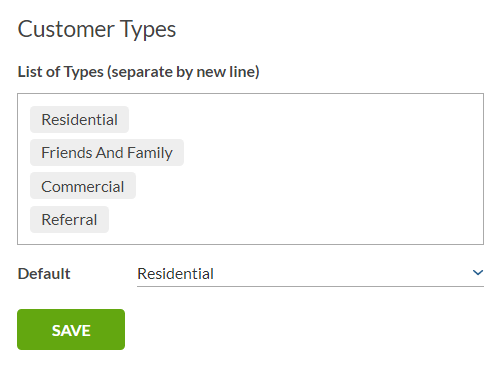
When creating customers, you have the ability to set a particular Customer Type. Add more Types here to get them added to the list of available Types within Customer profiles.
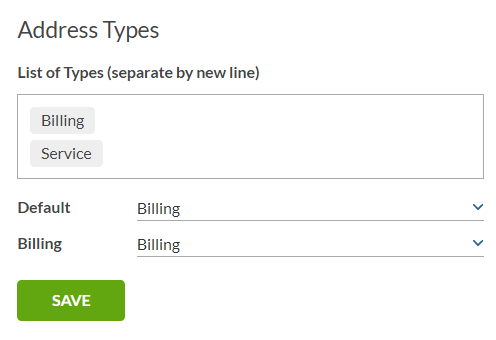
Use Address Types to notate Billing and Service Addresses, or add additional address types. When creating a new Address, the Default setting will be listed initially, but you can always adjust. If the majority of your Address Types are Billing, set that here to save time with creating customers.
When it comes to Invoices and Quotes, the Billing Address will be listed on the header, and the address where the work was scheduled will appear in the Service Address of the Invoice and Quote headers.
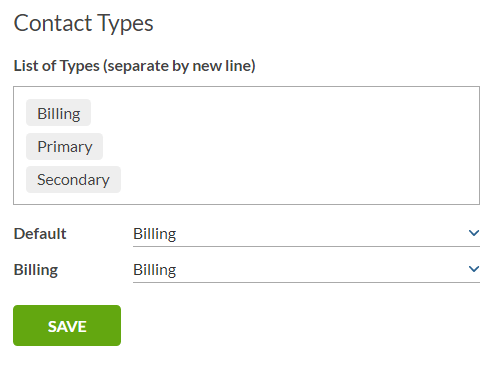
Contact Types work the same as Address Types. Setting a Default Contact Type will pre-fill this field to the specified type when creating a new Contact. The Billing field notates which Contact Type should receive Invoices and Quotes.

Similar to Customer Types, the Source Type is a great field to specify where you found your customer.
*Tip: If you do not need to track customer source, you can repurpose this field to something else you'd like to notate within the customer profile. First, rename it in your System Terminology, and then edit the List of Types for this field.
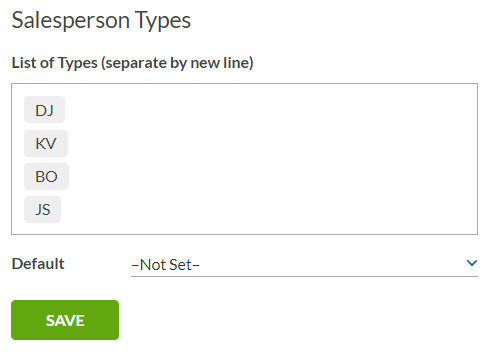
Salesperson Types are used to notate which employee of yours obtained a new customers' business. Salesperson Types are able to be added to Service Requests, or to Addresses.
If you integrate with QuickBooks, you also have the ability to map the Salesperson name to a Custom Field in QuickBooks. QuickBooks allows for Salesperson names to be up to 5 characters, therefore initials are encouraged.
*Tip: This field can also be repurposed as well. For example, change Salesperson to Dispatcher, and use it to have your dispatchers list themselves as the ones who scheduled the new Service Request.
Work Order Statuses
In this section, you can adjust your list of Work Order Statuses, such as Incomplete, En Route, Onsite, Complete, etc. Each status will have a Parent Label, and will include at least 1 additional sub-status within it.
Service Request Statuses will appear as Unassigned, Assigned, Completed, or Invoiced, depending on which statuses all Work Orders within the Service Request are in. You can filter by Service Request Status on the Schedule page.
Unassigned
When new Service Requests are created from the Customer page, the Work Order status will default to Unassigned until a user is assigned to it.
Incomplete
Once assigned, the Work Order will be set to Incomplete. More specifically, it will default to the first status in your list of Incomplete statuses, so be sure to arrange accordingly. You may also expand a status to adjust its color, simply by clicking the down arrow for a particular status.
En Route
This status is primarily used for technicians to notate they are on their way to a Work Order. This is helpful for the office to see when techs are on their way, but it also can trigger a notification to your customer letting them know the tech is on their way.
Onsite
Similar to En Route, this status is used by technicians to notate they are Onsite. An optional notification can also be sent to the customer when a status is changed to Onsite.
Complete
This is the most important status section. There are multiple different sub-statuses that can apply here, such as Complete - Quoted, Complete - Cancelled, or Complete - Return Needed, for example. You can notate which statuses are able to be invoiced by expanding the status and checking/unchecking the box that says "Work Order with this status can be invoiced".

*Note: You MUST have at least one Completed status that can be invoiced, or the option to invoice will not be present.
*IMPORTANT: If you integrate with QuickBooks Desktop, we recommend creating a status for Complete - Ready To Invoice, and Complete - Not Ready To Invoice (or whichever wording you'd like to use). Where the Not Ready To Invoice status would not have the checkbox selected to allow invoicing Work Orders in this status. This will prevent invoices from exporting to QuickBooks Desktop before you're ready.
Invoiced
Once you've invoiced a Completed Work Order, the Work Order status will automatically change to Invoiced. From here, any changes that need to be made to an invoice should occur on the invoice itself, unless you make the same changes to the Work Order and use the [Re-Invoice] button within the Invoice.
*Note: Once an Invoice is Paid, it will not adjust the Work Order Status to Invoiced - Paid, given payments are applied to Invoices, not Work Orders. It is simply an optional status if you'd like to manually adjust the Work Orders statuses.